
“Black is the hardest color in the world to get right–except for gray…” noted American fashion expert and magazine editor Diana Vreeland, and based on the feedback I received when I asked what topic I should blog about next, many Pittsburgh dog moms and dads agree. A whopping 65% of you answered that you were specifically looking for tips for photographing black dogs, so in recognition of February being Black Dog and Cat Syndrome Awareness Month, I’m sharing three of my top tips for photographing black and dark-colored dogs.
Shoot in the Right Light
With your dog’s dark-colored fur, your initial instinct may be to light them up with the brightest, most direct light you can find, but stop right there. Just like direct midday sun won’t result in the most flattering shots of your furry friend, the same holds true for black dogs. That’s because the contrast between a very dark dog and much brighter light poses a challenge for your camera in that it can easily trick your camera, causing it to work overtime in an effort to balance these extremes. So, what type of lighting should you aim for?
The ideal light when photographing dark dogs is actually evenly lit shade. Think a slightly overcast day. Clouds act as nature’s diffuser filtering harsher sunlight and lighting your subject more evenly. If you have access to a reflector, use a white cover to lift shadows slightly, create softer lighting, and add some catchlights, those subtle white reflections visible in the corners of a subject’s eyes when facing the light. A reflector can also enhance the contrast and depth of your dog’s fur. A pop of fill light from an off-camera flash can also help with this as long as you are cautious not to bring in too much light from your flash. If you’re not careful, you will create the same issues and look as if you were shooting in direct sunlight. This technique tends to work best when the sun is behind or slightly to the side of your dog in order to equally balance the light.
If you absolutely cannot avoid shooting in direct sunlight, the Golden Hour is a better time of day to do so. The Golden Hour is the preferred time for many photographers as it lends a softly illuminated golden warmth to your images. Generally, Golden Hour is roughly one to two hours before sunset or sunrise; you can calculate the exact time where you live at any point throughout the year using a sunrise/sunset app or Google calendar. I highly recommend the Sun Seeker app from iTunes and Google Play as well as Google Calendar’s sunrise and sunset calendar.
Meter for a Dark Dog
As I mentioned above, the contrast between light and dark can easily confuse your camera. If you’re familiar with metering on your camera, tweak your exposure compensation so that you are underexposing your black pup ever so slightly. Failing to do so, particularly if your dark dog is filling the majority of the frame, you may find yourself with an overexposed image. Start by underexposing by one or two stops.
Remember: Roses are Red, Dogs are Not Blue
It doesn’t take much for black dogs to look blue. No, not blue as in their mood; I’m talking about their actual color. I see this happen frequently when shooting dark dogs in shade. This is typically something I address in post-processing and there are a number of ways to do so. One option is to use Lightroom’s HSL panel and pull down the overall blue; however, keep an eye not to go too far with this, especially if your image has a lot of blue throughout it, such as in the sky or a person’s jeans or even white clothing. If that approach leaves your image looking dull or too desaturated, you can paint over the areas of the dog’s fur in which there is too much blue using the adjustment brush and pull down on saturation slightly while also adding a bit of yellow to warm up the fur within the temperature within Lightroom’s basic panel. If you’d prefer to take this technique to Photoshop, masking through an adjustment layer where you can target the blue using a hue/saturation adjustment in which you “paint” on the areas of your image that need to say bye-bye to blue, works wonderfully.
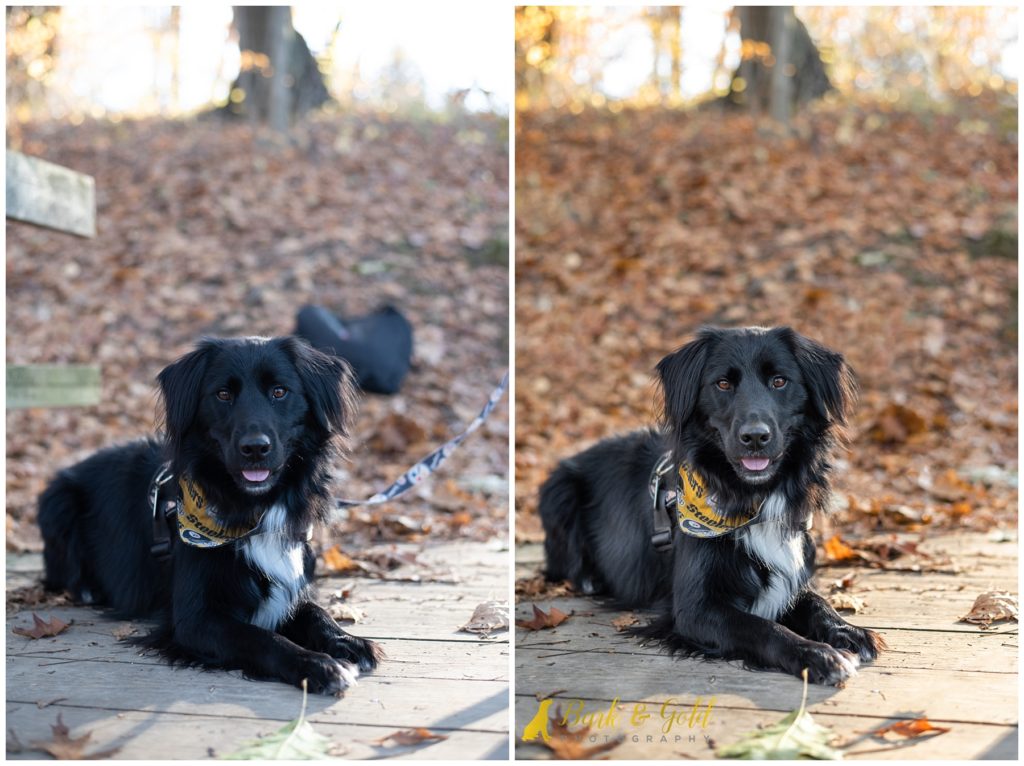
In this before-and-after of Gussie taken during a November Golden Hour in a wooded spot shaded with trees, you can see how blue her fur looks even with the sun throwing light onto her. A quick adjustment to white balance to warm up a slightly cool image eliminated much of the blue tones within the shadows falling on her fur while a few swipes of a targeted adjustment brush reduced the remaining blues. Notice, too, how decreasing the shadows pulled out the crisp details in Gussie’s face and how a touch of a brightening on her eyes make them pop that much more.
Play in Post
Post-processing will take your final image to the next level and is, dare I say, a must. I recommend using an editing software or app to pull up on your shadows to reveal more detail within the fur and face. Adjusting this slider affects primarily the areas of your image in which there is still a hint of detail. You can also pull down on the blacks a bit to add a bit of contrast. Brighten up those peepers and you’ll likely see a noticeable difference in the quality and clarity of your dog’s photo.
If you’re still struggling to photograph your black or dark-colored dog, I can help! Click here or give me a call at 724-913-BARK (2275) to inquire and learn more. For more information on Bark & Gold Photography sessions, visit “Your Session” in the menu and be sure to share your email on my homepage to join the VIP list.